I ruined a cue by leaving it in my car. Not a beater stick, either. It was a Viking I had played on for three years, and I left it propped in the back seat for a long weekend in July. When I unscrewed it Monday morning, the shaft had a bow you could see from across the table. That was a $140 lesson in what heat and humidity actually do to maple. I learned everything in this guide the hard way, so you do not have to.
The good news is that protecting a cue is not complicated. You need to understand four things: climate, position, impact, and tip hygiene. Follow the steps below and a decent cue will stay straight and responsive for a decade or longer. Skip them and even a premium shaft will punish you within a season.
If your cue is traveling unprotected right now, this is where to start
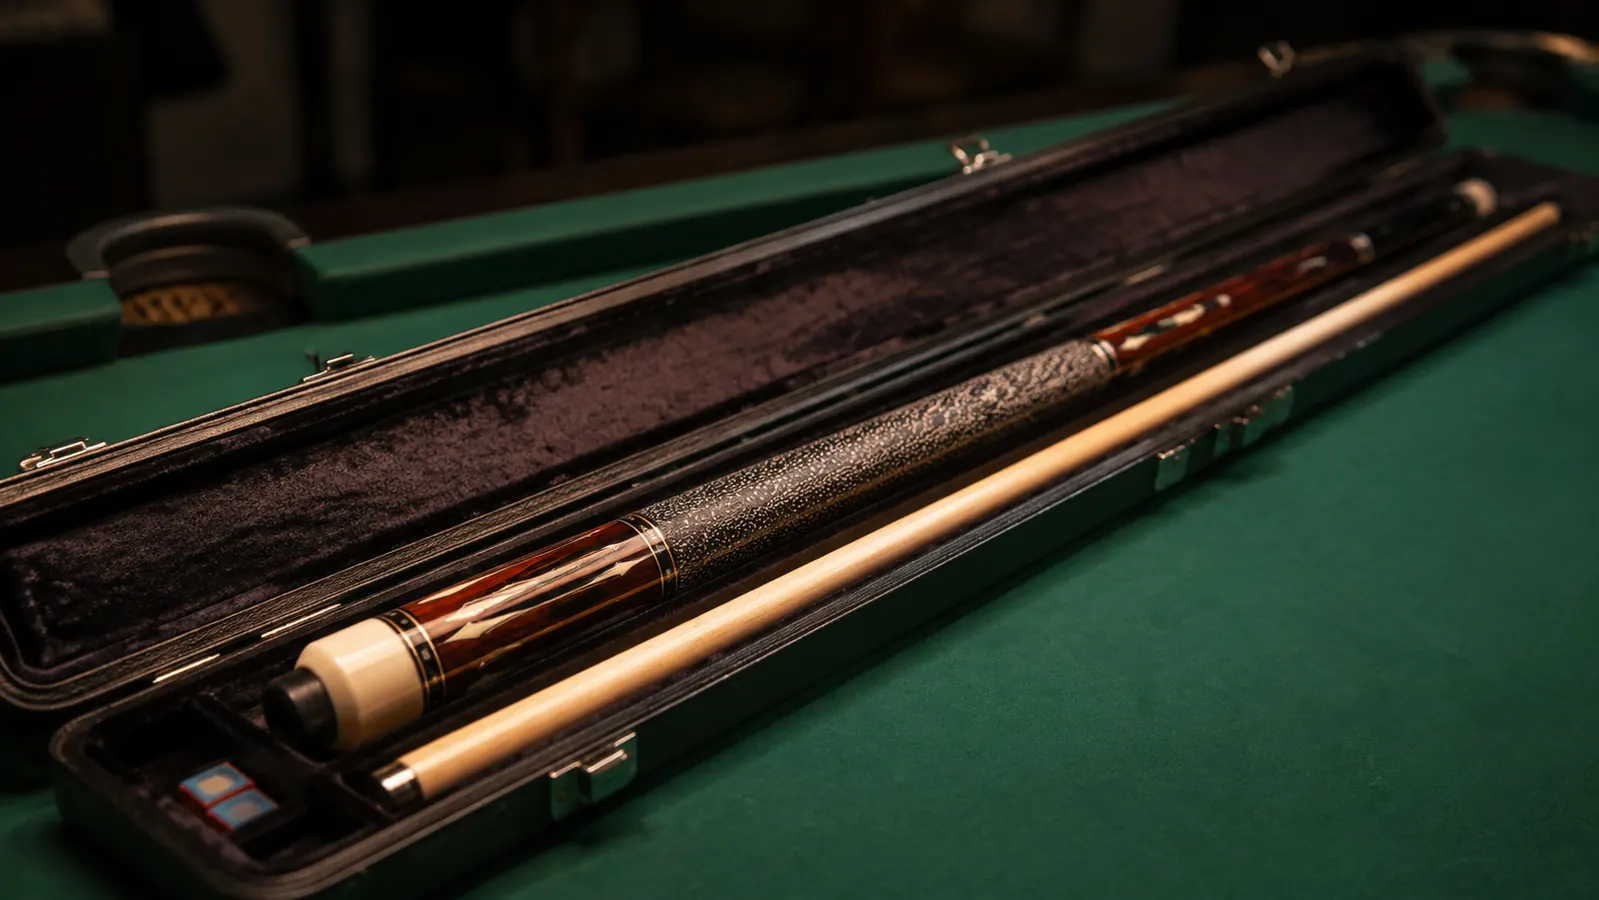
The Casemaster Q-Vault Supreme is the most-reviewed hard cue case on Amazon, 4,598 ratings, and it costs less than a round of drinks at most pool halls. Hard-shell aluminum rail, velvet-lined interior, locking latches. It is the simplest way to stop impact damage before it starts.
Amazon Check Today's Price on Amazon →Step 1: Understand Your Enemy, Humidity and Temperature
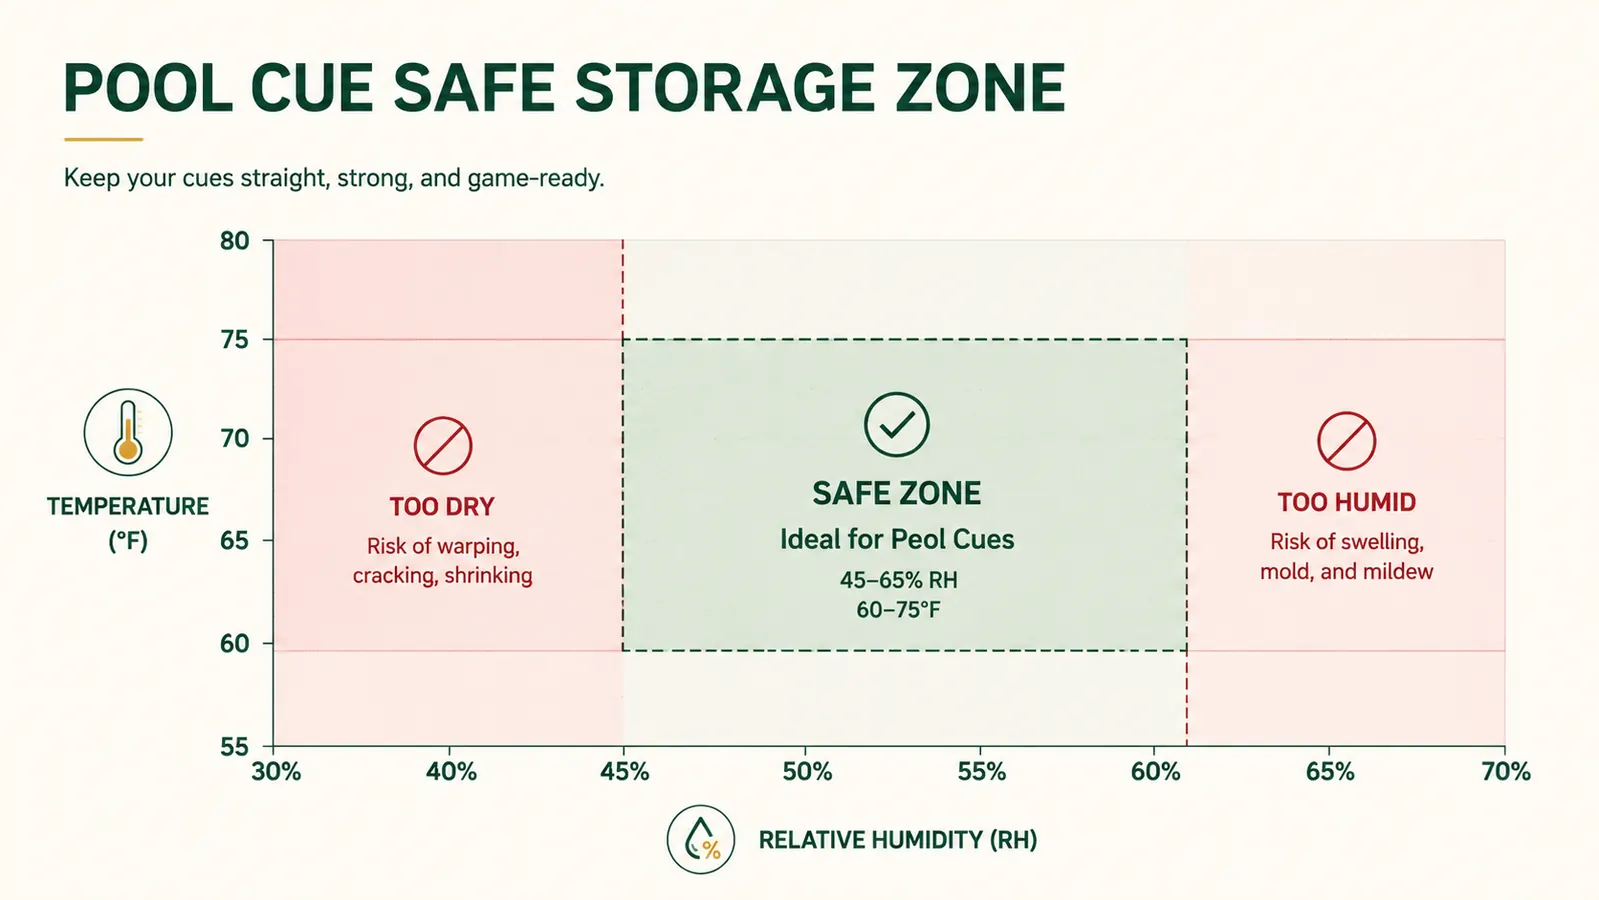
Wood moves. Every maple shaft expands when relative humidity climbs and contracts when it drops. The problem is that expansion and contraction are not always uniform across the grain, which is what causes warping. The sweet spot for cue storage is 45 to 65 percent relative humidity and 60 to 75 degrees Fahrenheit. Outside those bands, you are putting stress on the shaft every single day even when the cue is just sitting there.
Get a cheap digital hygrometer for wherever you store your cue. They run about eight dollars on Amazon. If your storage space reads below 40 percent in winter, add a small humidifier nearby. If it spikes above 70 percent in a humid basement, a dehumidifier or moisture absorber packets help. The cue does not need a climate-controlled vault. It just needs a consistent environment that does not swing 30 points of humidity in 24 hours.
Cars are the worst offenders. A sealed car in July can reach 130 to 160 degrees Fahrenheit inside. A wooden shaft left in that for even two hours begins to dry out and stress along the grain. In winter, a frozen car introduces the same risk from the opposite direction. Never store a cue in a vehicle for more than the duration of your drive to the pool hall.

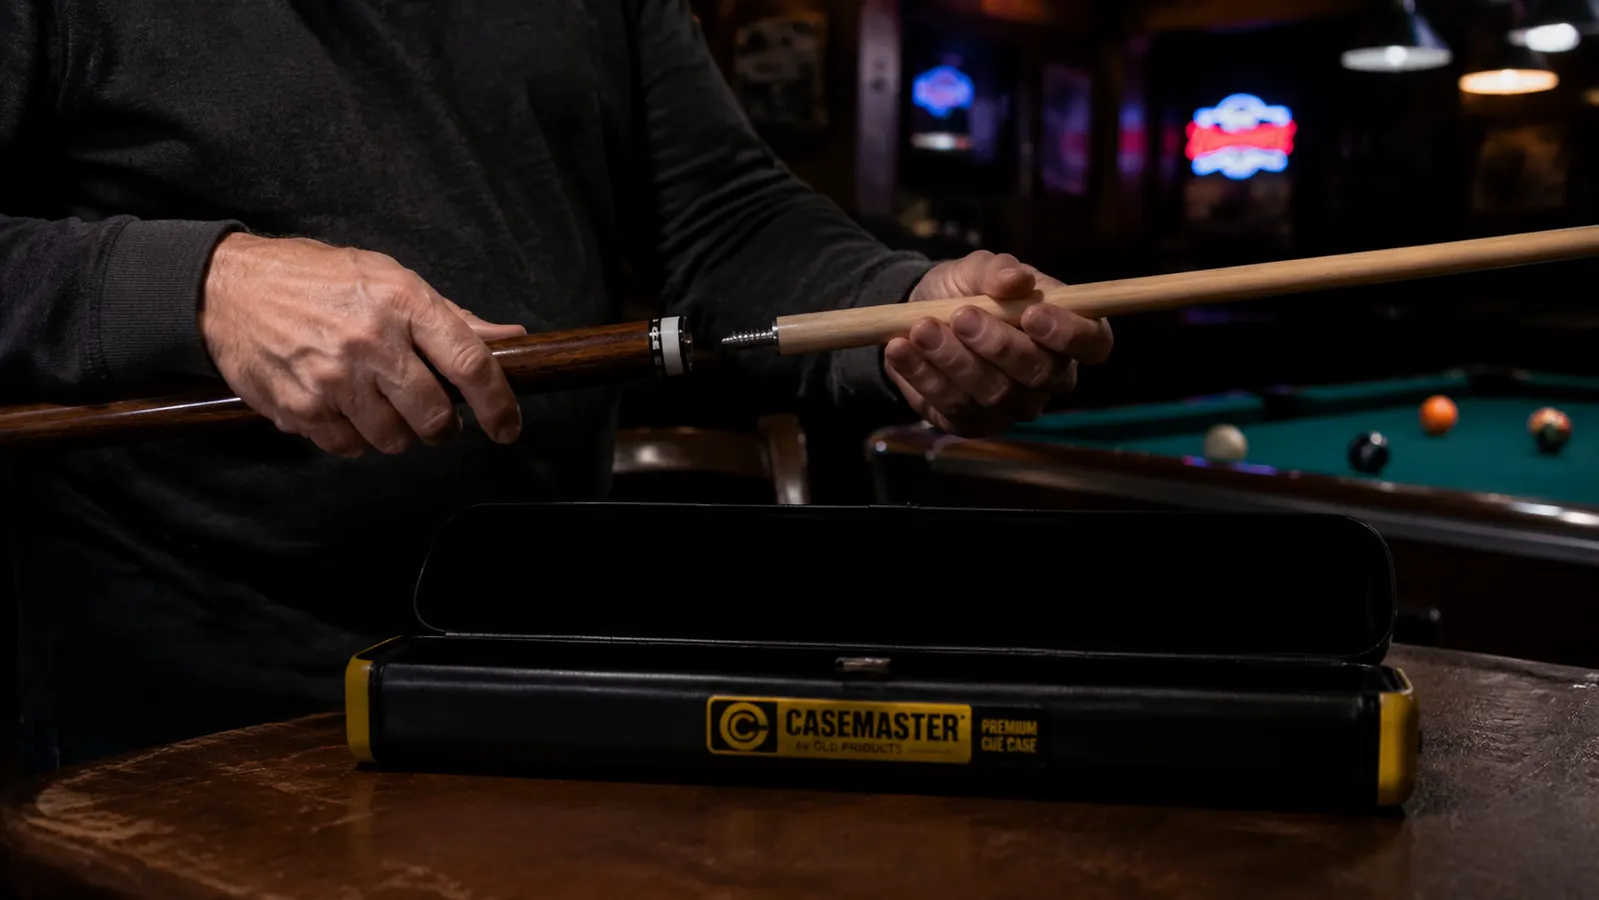
Step 2: Protect the Joint Every Time You Assemble and Disassemble
The joint is the most mechanically stressed part of a two-piece cue. Every time you screw the butt to the shaft, you are applying rotational pressure to the threads and the pin. Over thousands of cycles, a joint that is cross-threaded even once, or over-torqued regularly, develops play. That play shows up as a slight wobble mid-stroke, and it quietly wrecks your shot consistency before you can even diagnose the problem.
The fix is simple: always align the joint straight before engaging the threads. Start the connection by hand, feel it seat cleanly, then rotate until snug. Snug is not the same as tight. You should not need to apply real force. A properly machined joint will be secure when it is finger-tight plus a quarter turn. If you are cranking it, you are either cross-threading or there is debris in the threads. Wipe the joint collar and pin with a dry cloth after every session to remove chalk dust and skin oils that accelerate wear.
If you play in league and transport your cue assembled in a soft case, reconsider. Every bump in transit torques the joint. Disassemble to two pieces every time you case the cue. Your joint life will double.
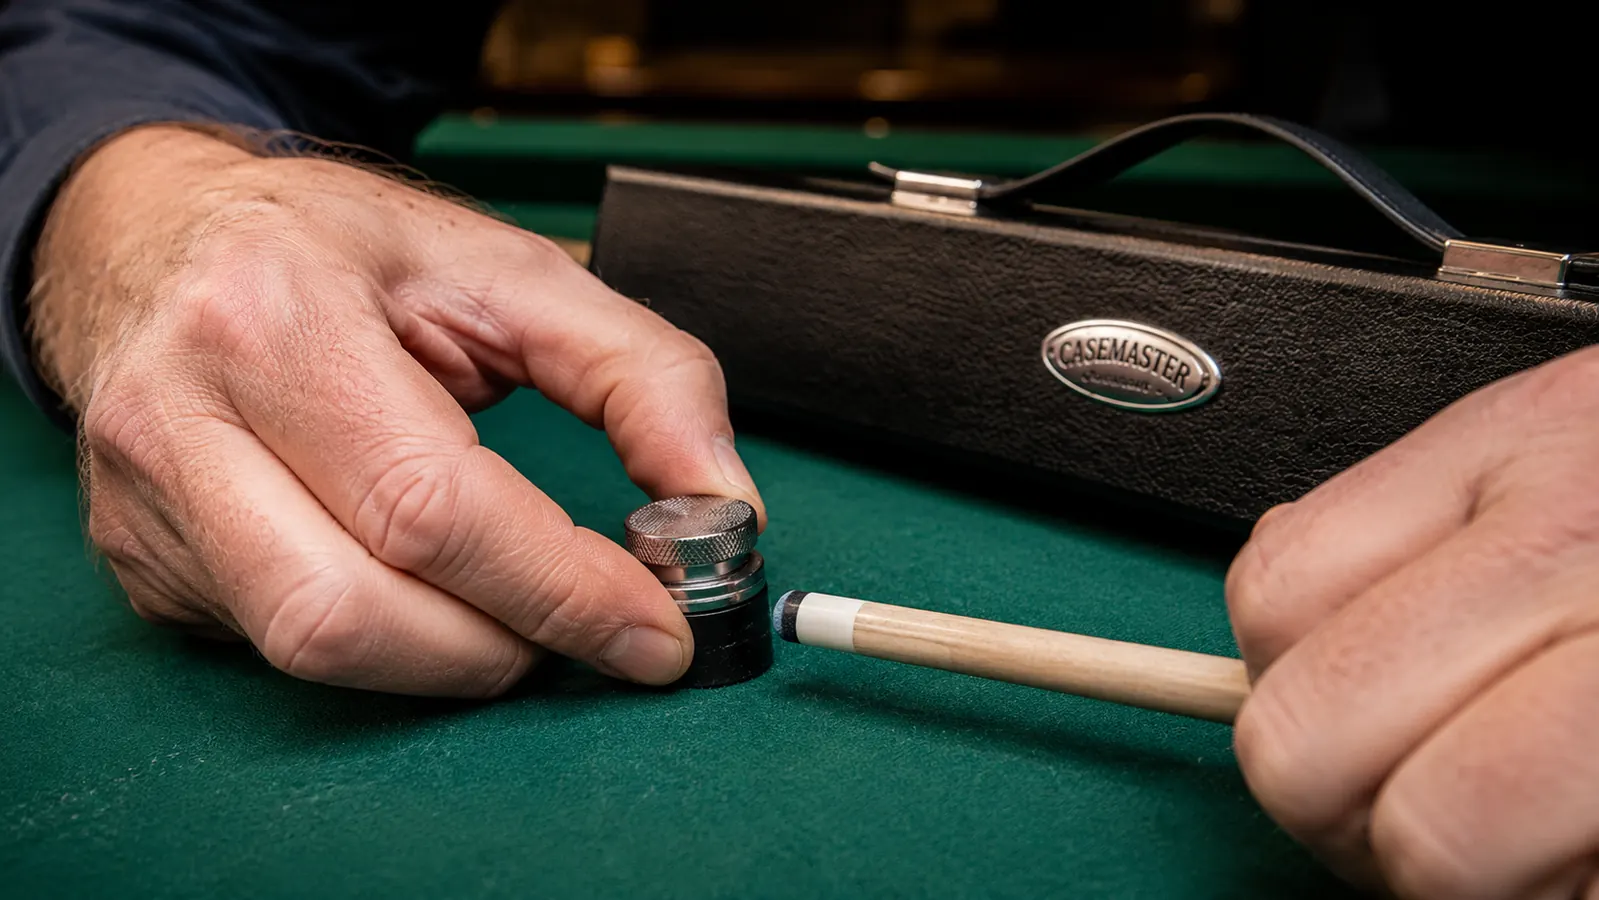
Step 3: Maintain Your Tip Before It Fails on You
A pool cue tip mushrooms. The leather or phenolic compound deforms outward past the ferrule edge under repeated impact. Once a tip mushrooms past the ferrule diameter, you have two problems. First, the contact point shifts off-center, which introduces inconsistency on every shot. Second, a mushroomed tip catches the cloth on draw shots and tears it. Most rooms will quietly charge you for that damage.
Shape your tip every four to six sessions using a tip tool, which is a small device with a rounded surface that presses the tip back into a domed profile. The ideal tip shape is a nickel's radius of curvature, though some players prefer a dime radius for more cut-shot control. After shaping, burnish the sides of the tip with a burnisher or the smooth back of your tip tool to compact the leather fibers. This extends tip life and improves chalk adhesion.
Replace the tip when it is less than four millimeters tall, when it has cracks visible at the sides, or when chalk no longer adheres consistently even with good technique. A worn tip causes miscues that players often attribute to bad stroke mechanics. If you suddenly develop a miscue problem that was not there six months ago, measure the tip height before you blame your stroke.
A mushroomed tip costs you draw shots and tears the cloth. Four minutes with a tip tool every month is cheaper than a re-tip and cheaper than a cloth repair.
Step 4: Clean and Condition the Shaft Regularly
A maple shaft accumulates three things over time: chalk dust, skin oil, and oxidation. All three increase friction between the shaft and your bridge hand, which disrupts your stroke tempo and forces you to grip harder to compensate. You can feel it when a shaft gets dirty: the stick drags through your fingers instead of gliding.
After every session, wipe the shaft with a slightly damp microfiber cloth, then dry it immediately. Once a month, use a cue conditioner specifically formulated for maple or a very light application of boiled linseed oil on a cloth. Work it into the wood in the direction of the grain, then buff off the excess. This keeps the shaft from drying out and developing surface cracks. Do not use furniture polish, baby oil, or anything silicone-based. Silicone fills the wood grain instead of conditioning it and eventually makes the shaft tacky.
For low-deflection carbon fiber shafts, skip the oil entirely. Carbon does not absorb moisture or dry out. A microfiber wipe after every session is all you need. Clean the ferrule separately with a cotton swab and isopropyl alcohol to remove chalk buildup at the tip base.
Step 5: Transport in a Hard Case Every Single Time
A soft bag can absorb incidental bumps, but it offers no structural protection against a real impact. Drop a soft case onto a concrete floor from table height and your shaft takes the force directly. Most warps and shaft cracks from transit happen in soft bags. A hard case with rigid walls transfers impact energy into the case shell instead of into the cue.
The Casemaster Q-Vault Supreme is the reference standard for affordable hard case protection. The aluminum-reinforced rail wraps the entire perimeter, the latches lock the shell rigid, and the velvet interior holds the cue in position without letting it shift and rattle. I have carried mine to a hundred and fifty league nights, a dozen open tournaments, and four road trips. The exterior has dents. The cue inside has none.
When loading the case, always rest the cue tip in the padded tip slot and the butt in the corresponding butt cradle. Never lay the cue loose in the case with room to slide. Shaft-to-shell contact during transit is one of the most common causes of surface dings on otherwise well-maintained cues.
Step 6: Store Horizontally at Home
Standing a cue upright in a corner is the default move, and it is the wrong one. A cue stored vertically rests its full weight on the tip or the rubber bumper for weeks at a time. Over months, gravity loads the shaft unevenly along its length, and a slight bow begins. It is slow, it is subtle, and by the time you notice it on the table the warp is already set.
Store the cue horizontally on a wall-mounted cue rack with at least two support points, ideally spaced at the butt and at the midpoint of the shaft. Wall racks run from ten to thirty dollars at any billiards supply shop and most of them hold four to six cues. If you own multiple cues including a break cue and a jump cue, a rack keeps them all accessible and protected without leaning against anything that could put lateral pressure on the shaft.
When you travel and the cue stays in its hard case for more than a day, lay the case flat rather than standing it upright. The same gravity argument applies to the cue inside. A flat case on a shelf is always better than a case standing in a closet corner.
Step 7: Clean the Cue After Every Use
Chalk residue is mildly abrasive. Left on the shaft, it acts like very fine sandpaper against your bridge hand over thousands of strokes, and it accelerates the oxidation that makes a maple shaft look gray and feel rough. A thirty-second wipe-down after every session costs nothing and adds months to the life of a finish.
Wipe the shaft with a clean dry cloth from ferrule to joint. Wipe the butt and wrap separately. If you use an Irish linen or nylon wrap, avoid moisture entirely on that section because it can cause linen to fray and adhesives to soften. For leather wraps, a very light wipe with a barely damp cloth is fine. Check the rubber bumper at the base of the butt. If it is cracked or missing, replace it. A missing bumper means the wood end grain is hitting hard floors when you place the cue vertically, which will eventually split the butt.
Put the cue straight into the case or onto the rack after wiping. Do not leave it resting on the table rail or leaning against the bar while you finish your drink. That is how cues get knocked over, and a cue dropping onto a concrete floor butt-first can crack the joint collar or chip the ferrule regardless of how good the cue is.
What Else Helps
Beyond the seven steps above, a few small habits compound over time. Mark your case with your name and phone number on the inside lid so it comes back to you if left at a tournament. If you own a cue worth $300 or more, photograph the shaft at full length and the joint collar up close before the first league night. If it ever gets swapped out accidentally, you have proof of condition. Some league rooms have a cue-swap problem at busy nights, not necessarily theft, just honest mistakes when six players are running tables in a small space.
If you notice any hint of a bow, do not try to steam or force it straight yourself. Bring it to a cue repair tech who has a straightening jig. A DIY correction almost always makes the problem worse. Warps under two millimeters at the midpoint are sometimes fixable. Deeper warps usually mean a shaft replacement is more cost-effective than a repair.
The single upgrade that prevents most cue damage between sessions
If you take one thing from this guide, it is this: a hard case stops more damage than any other single change. The Casemaster Q-Vault Supreme holds one complete two-piece cue, protects it with a rigid aluminum-edged shell, and costs less than a replacement tip and shaft re-installation. Over 4,500 buyers agree it does the job.
Amazon Check Today's Price on Amazon →